Tag Archives: vegetable

Besan Burfi – from the heirloom

Standard

This is my mom’s signature dish – she has been making this since decades literally. All my relatives, cousins, friends love it. Because of the long shelf life of this sweet, it is often packed along as a parting gift, and many times is made in large quantities to ‘pack with love’ in the luggage for folks going out of the country for study or work. Chickpea flour roasted in loads of clarified butter with sugar and nuts added is considered to be a nutritious and energy boosting combination – though the truth is that the same combination makes it super calorie dense and irresistible – and when chomped down in five-at-a-time portions, it gives you more energy than needed for a full marathon – and IMHO should be banned for people who type and talk for a living (that would be me and 95% of the people around me). But then for my kinds, everything but spinach should be banned, and since it is not, why not indulge into this culinary pleasure?
Now since this recipe comes from my mom, who knows the microwave as a machine to re-heat and not as chef Mike who would ‘cook’ all meals on all weekdays, the recipe literally involves labor and love – in simple terms – elbow grease! Don’t even think about it unless you are ready to spend like an hour peering over the wok, vigorously stirring a mixture of flour and butter – trying to roast it and prevent it from burning at the same time. You also need some kind of special vision – to distinguish between yellow,dark yellow, brown, golden brown and umm..burnt! Jotting down the recipe here, though in this age of ready-to-cook meals, I am positive Aditi will never even think of attempting it, but at least I will have the satisfaction of having passed on a tradition – from one generation to another.

besan burfi1

Ingredients –
Chickpea flour/ Gram flour/ Besan – 3 and 1/4 cup
Semolina / Rawa/ Sooji – 3 tbsp (optional)
Ghee/ Clarified butter – 1 and 1/4 cup
Sugar – 2 and 1/4 cup
Cardamom / Ilaichi powder – 1/2 tbsp
Ground almonds – 1/2 cup
Almonds – slivered – 1/4 cup (for garnishing – optional)

Method –
1. Add the besan and ghee in a thick bottomed wok and put it on the burner on medium heat.
2. If you are using the regular fine textured besan, and like a grainy texture, add the sooji too. Else, leave it out. There is also a mota besan which has been ground to have a grainy texture, a lot of people use it – you don’t need the sooji in that case.
3. Keep mixing and turning the mixture at it starts to cook – don;t even think about raising the gas mark to high to expedite the process – the roasting needs to be done slowly and uniformly.
4. After five minutes of continuous stirring, your mind will start to tell you that it has been very long and the besan looks roasted. Dont give in to those mind games. Keep an eye on the watch – like baking. It takes 30 to 35 minutes to get this quantity of besan perfectly roasted, so have patience and continue.
5. After 30 minutes, the color will change to a golden brown, there will be a nice earthy aroma all around the kitchen – add in the ground almonds and cardamom powder at this stage and switch off the gas. Remove the wok to a cold burner – it takes seconds for the besan to burn – it will go from brown to black and bitter.
6. Let this whole deal cool for 20 to 25 minutes. Meanwhile, take a big steel plate with raised sides or a baking tray and grease it’s surface with ghee or oil.
7. Once the the besan is warm (not hot), which it should be after 25 minutes, add the sugar and mix. Dont add the whole sugar at one go, keep adding and mixing half cup at a time. Taste the mixture if you want less or more sugar.
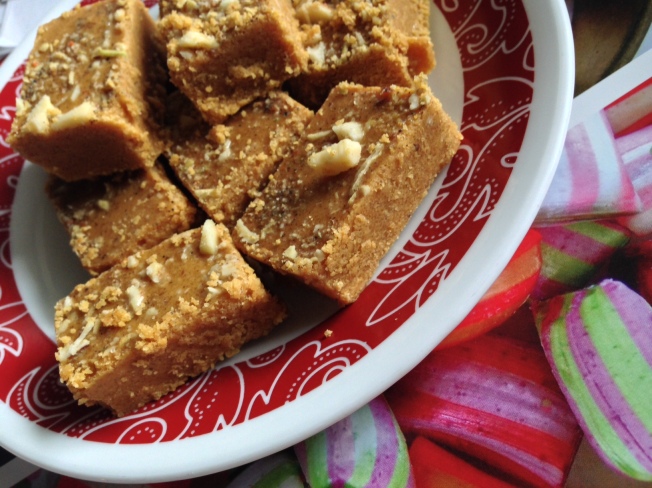
8. The mixture will be pretty liquid-y, don’t worry about it – that is the way it should be. Dump the whole thing in the big plate or tray and smooth the surface using the back of a spoon or bowl. Sprinkle the slivered almonds or pistachios, I has some Everest Doodh Masala too which I spread on it.
9. Put the tray in the fridge for an hour and later, cut into pieces using a sharp knife.
10. Store in an air tight container for up to a month – it has no water or dairy so has a long shelf life.

besan burfi4

Ready to be cut in to pieces.

Chole with Palak and Kale – Iron Shakti!

Standard


Since the time the doctor suggested Aditi needs more iron, I spent two days on the net reading up all I could about sources of iron. Though it was convincing to know that most of the plant sources do contain iron – the sad part is that it is all ‘non heme’ iron, which means that the body does not absorb it easily. One good way of having iron absorbed better is to combine your food with vitamin C sources like lemon, orange juice.
Now, we have always been green lovers, but this call for iron brought into my fridge bags of spinach, methi, mint, kale and collard. The leaves have started to appear in everywhere – daal, paratha, sabji, cheela and most recently – the humble chole. I had been making palak chole often, but addition of kale was Nilesh’s idea and the result was different and interesting. While pakal loses all its form (and water) when cooked, kale gave body and bite to the dish. I wish kale was available in India too – till that time, try adding any greens you can find to chole and you will be delighted with the result.

Ingredients –
Chole/ chickpeas/ chane – 1.5 cups (source of iron)
Spinach and/or Kale leaves – 2 to 3 cups, cleaned chopped roughly (source of iron)
Tomatoes  – 2, chopped small or pureed (source of iron)
Onions – 2 small or 1 large – chopped small
Ginger  – half inch piece, grated
Garlic – 2 cloves (optional), grated
Kasoori methi – 1.5 tsp
Salt – as per taste
Turmeric- 1 tsp
Red chili powder – 1 tsp
Chana masala/ garam masala – 2 tsp
Jeera – half tsp, Rai – half tsp
Oil – 3 tsp

Method –
1. Soak the chole overnight or 6 to 8 hours with lots of water. Wash them and boil in a cooker with a pinch of salt. I dont like them too mushy, so 3 to 4 whistles on a medium flame are good.
2. Heat oil in a non stick kadhai.
3. When oil is hot, add jeera and rai. When they pop and sizzle, add ginger and garlic and let them leave their raw small.
4. Add the onion pieces and keep stirring. The onions should get pale and soft and start browning.
5. Add the tomatoes, chana masala, turmeric, red chili powder, salt and let the tomatoes cook till they get all mushed up and the masala starts to give a good aroma.
4. Now add the kasoori methi, and chopped greens. Cook them for just a minute and add the boiled chole. We want the chole to cook in the juices of kale and spinach – this brings out the flavor and blends everything well.
5. Cook covered for 5 minutes. No need to add water as greens release lots.Taste and adjust the salt etc.
6. Eat with roti/ paratha.

Paalak Paneer Paratha

Standard

Baby A started going to formal school in April and I continued my pursuit for nutritious food that I could put in her tiffin box – which keeps her full till she reaches her daycare. One advantage on my side is that A loves methi and everything green for her is methi – even if it is spinach/ paalak or dhania/ coriander. So while methi paratha remained her favorite in winters – spinach came to my rescue as soon as summers arrived and methi disappeared from the market. This one is a spinach paratha, to which I add in ‘ever-available-in-delhi’ paneer. This healthy paratha serves as our breakfast too. Just that we have it with dahi rather than butter – what is baby A’s favorite accompaniments to these or any other parathas.

Paratha and Butter  in tiffin

Paratha and Butter in tiffin

Ingredients –
Paalak/ Spinach – 1 cup (cleaned, washed , chopped fine).
Paneer – 1 cup (grated) – I used Mother Dairy brand.
Whole wheat flour – 2 cups
Salt – to taste
Haldi – a pinch
Ajwain – a pinch
Oil – to cook the parathas.
Water – to knead the dough

Method –
1. Take the wheat flour in a wide bowl.
2. Add the salt, haldi and ajwain . Mix well.
3. Add the spinach, grated paneer and mix.
4. Add water little by little and knead the dough. Remember that both paneer and spinach add moisture and you may need very less water to get a soft, pliable dough.
5. Let it rest for 5 mins. Meanwhile, heat a griddle/ tawa.
6. Pinch out a ball of dough and roll out round parathas . The thickness must be a bit more than rotis/ phulkas.
7. Put the paratha on the heated tawa. Once brown spots appear n one side – apply oil and turn the paratha. Cook the other side similarly.
8. Serve with dahi or butter. These are very soft due to the paneer and can be packed for lunch too.

Heap of paratha rolls - easy to eat between office meetings!

Heap of paratha rolls – easy to eat between office meetings!

Since this is a kid food, comprising of 3 main ingredients – wheat flour, Spinach and Paneer – I am sending this to the Kid’s delight event hosted by Pavani on her blog here. Also linking it to Valli’s announcement page.
Kid's Delight-April 2013-300px